-
- Enhancing VPS Performance with Content Delivery Networks (CDNs)
- Understanding CDNs and Their Benefits
- Configuration Steps to Integrate a CDN with Your VPS
- Step 1: Choose a CDN Provider
- Step 2: Create an Account and Configure Your CDN
- Step 3: Update DNS Settings
- Step 4: Configure Caching Rules
- Step 5: Test Your Configuration
- Practical Examples of CDN Integration
- Best Practices for Optimizing CDN Performance
- Case Studies and Statistics
- Conclusion
Enhancing VPS Performance with Content Delivery Networks (CDNs)
In today’s digital landscape, website performance is crucial for user experience, search engine rankings, and overall business success. Virtual Private Servers (VPS) offer a flexible and cost-effective solution for hosting websites, but they can sometimes struggle with high traffic loads or geographical latency. This is where Content Delivery Networks (CDNs) come into play. By distributing content across multiple servers worldwide, CDNs can significantly enhance the performance of your VPS-hosted website. This guide will explore how to effectively integrate a CDN with your VPS, providing actionable steps, practical examples, and best practices to optimize your web performance.
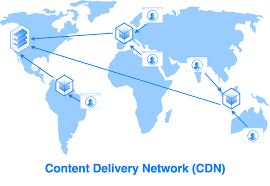
Understanding CDNs and Their Benefits
A content delivery network (CDN) is a network of servers strategically distributed across various locations to deliver content to users more efficiently. The primary benefits of using a CDN include:
- Reduced Latency: CDNs cache content closer to users, minimizing the time it takes to load web pages.
- Improved Load Times: Faster content delivery leads to better user experiences and lower bounce rates.
- Scalability: CDNs can handle spikes in traffic, ensuring your website remains accessible during high-demand periods.
- Enhanced Security: Many CDNs offer DDoS protection and secure data transfer protocols.
Configuration Steps to Integrate a CDN with Your VPS
Integrating a CDN with your VPS involves several key steps. Follow this guide to set up your CDN effectively:
Step 1: Choose a CDN Provider
Select a CDN provider that meets your needs. Popular options include:
- Akamai
- Cloudflare
- AWS CloudFront
- Fastly
- StackPath
Step 2: Create an Account and Configure Your CDN
Once you’ve chosen a provider, create an account and follow their setup instructions. This typically involves:
- Logging into your CDN account.
- Adding your website as a new property.
- Configuring the origin server (your VPS) settings.
Step 3: Update DNS Settings
To route traffic through the CDN, you need to update your DNS settings:
- Access your domain registrar’s DNS management panel.
- Change your domain’s nameservers to those provided by your CDN.
- Alternatively, you can create a CNAME record pointing to your CDN URL.
Step 4: Configure Caching Rules
Set up caching rules in your CDN dashboard to determine how content is cached and served. Common configurations include:
- Static assets (images, CSS, JavaScript) should have longer cache durations.
- Dynamic content may require shorter cache durations or cache purging strategies.
Step 5: Test Your Configuration
After setting up your CDN, test your website to ensure everything is functioning correctly. Use tools like:
- GTmetrix
- Pingdom
- Google PageSpeed Insights
Check for improvements in load times and ensure that content is being served from the CDN.
Practical Examples of CDN Integration
Consider a small e-commerce website hosted on a VPS. By integrating Cloudflare as a CDN, the website can:
- Reduce load times from 3 seconds to under 1 second for users in different geographical locations.
- Handle a traffic spike during a flash sale without crashing.
- Protect against DDoS attacks, ensuring the site remains operational.
Best Practices for Optimizing CDN Performance
To maximize the benefits of your CDN, consider the following best practices:
- Regularly review and update caching rules based on user behavior and content changes.
- Utilize HTTP/2 for faster data transfer and improved performance.
- Implement SSL/TLS for secure data transmission.
- Monitor CDN performance metrics to identify areas for improvement.
Case Studies and Statistics
According to a study by Akamai, a 100-millisecond delay in website load time can decrease conversion rates by 7%. Additionally, a case study involving an online retailer showed that integrating a CDN reduced page load times by 50%, resulting in a 20% increase in sales. These statistics highlight the significant impact that CDNs can have on performance and revenue.
Conclusion
Integrating a CDN with your VPS is a powerful strategy to enhance website performance, improve user experience, and ensure stability during traffic spikes. By following the configuration steps outlined in this guide, leveraging practical examples, and adhering to best practices, you can optimize your web presence effectively. Remember to continuously monitor performance and adjust your CDN settings as needed to maintain optimal results. With the right approach, a CDN can transform your VPS-hosted website into a high-performing, reliable platform that meets the demands of today’s users.